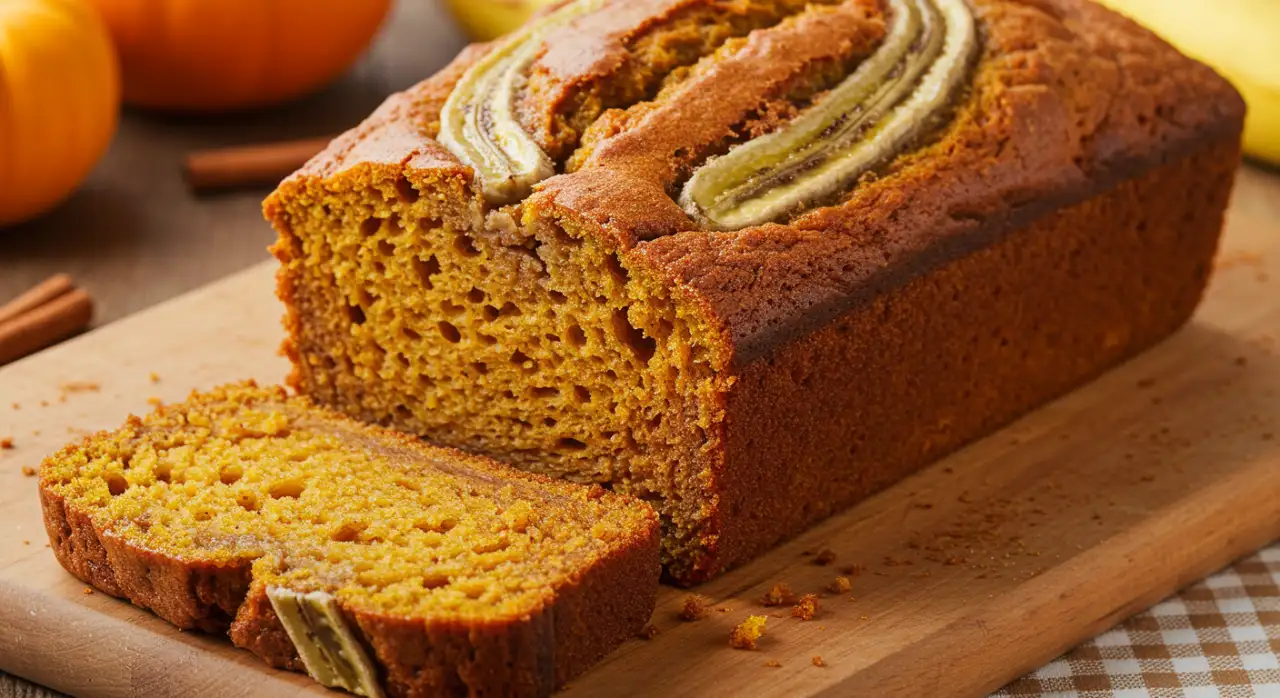
Hey there, baking enthusiasts! Let’s talk about something truly scrumptious—a pumpkin banana loaf that’s soft, moist, and packed with flavor. You know, sometimes life throws you overripe bananas and leftover pumpkin purée, and instead of letting them go to waste, why not whip up this delightful treat? It’s perfect for breakfast, dessert, or even an afternoon snack. In this article, we’ll dive into everything you need to know about making the ultimate pumpkin banana loaf. From its history to step-by-step instructions and fun variations, you’ll leave here ready to bake like a pro. So grab your apron, and let’s get started!
Table of Contents
Introduction to Pumpkin Banana Loaf
Why Pumpkin Banana Loaf is a Must-Try Dessert
If you’ve ever wondered what happens when two fall favorites collide, look no further than the pumpkin banana loaf. This isn’t just any ordinary baked good—it’s a flavor explosion that combines the sweetness of ripe bananas with the earthy warmth of pumpkin. Honestly, it’s one of those recipes that feels fancy but is super easy to pull off. Plus, who doesn’t love sinking their teeth into something that tastes like autumn wrapped in bread form?
What makes this loaf extra special is how versatile it is. Whether you’re hosting a family gathering or craving a cozy pick-me-up on a chilly day, this recipe has got your back. And guess what? It’s healthier than most desserts because both pumpkin and bananas bring natural sweetness and nutrients to the table. Who needs refined sugar when nature already provides the goods?
The Benefits of Baking with Pumpkin and Banana
Let’s break it down real quick. Pumpkins aren’t just for carving jack-o’-lanterns—they’re packed with vitamins and fiber, which keep things nice and nutritious. Meanwhile, bananas add moisture and richness without weighing the loaf down. Together, they create a texture so dreamy you might find yourself sneaking seconds—or thirds!
And hey, if you’re worried about time, don’t be. Most of the steps are straightforward, and prep work can take as little as 15 minutes. Trust me, once you try this pumpkin banana loaf, it’ll become a staple in your kitchen repertoire.
The History Behind Pumpkin Banana Bread
Origins of Pumpkin in Baking
So, let’s take a little trip back in time. Pumpkins have been around for centuries, and they weren’t always just for carving into spooky faces. Native Americans were among the first to use pumpkins in their cooking, often roasting or drying them for storage. When European settlers arrived, they picked up on this trend and started incorporating pumpkin into pies, soups, and yes—even bread! Over time, pumpkin became a staple in seasonal baking, especially during fall.
Fast forward to today, and pumpkin is practically synonymous with cozy autumn vibes. But here’s the kicker: it wasn’t until much later that someone thought to combine it with another beloved ingredient—bananas. And boy, are we glad they did! The result? A pumpkin banana loaf that marries tradition with creativity.
Banana Bread’s Evolution and Its Fusion with Pumpkin
Now, let’s talk about banana bread. Believe it or not, banana bread didn’t become popular until the 1930s, thanks to the invention of baking powder. Before then, overripe bananas mostly ended up in the trash. But once people realized how easy it was to turn mushy bananas into something delicious, there was no turning back.
The fusion of pumpkin and banana came later, probably by accident—or maybe genius experimentation. Either way, it caught on fast because, well, why wouldn’t it? Both ingredients complement each other beautifully, creating layers of flavor that make every bite feel like pure magic. Plus, combining these two gives you the best of both worlds: the comforting familiarity of banana bread and the festive charm of pumpkin spice.
And guess what? This combination isn’t going anywhere anytime soon. If anything, it’s becoming more popular as bakers experiment with new twists and variations. So whether you’re sticking to the classic recipe or adding your own flair, the pumpkin banana loaf is here to stay—and that’s definitely worth celebrating!
Key Ingredients for the Perfect Pumpkin Banana Loaf
Choosing the Right Pumpkins and Bananas
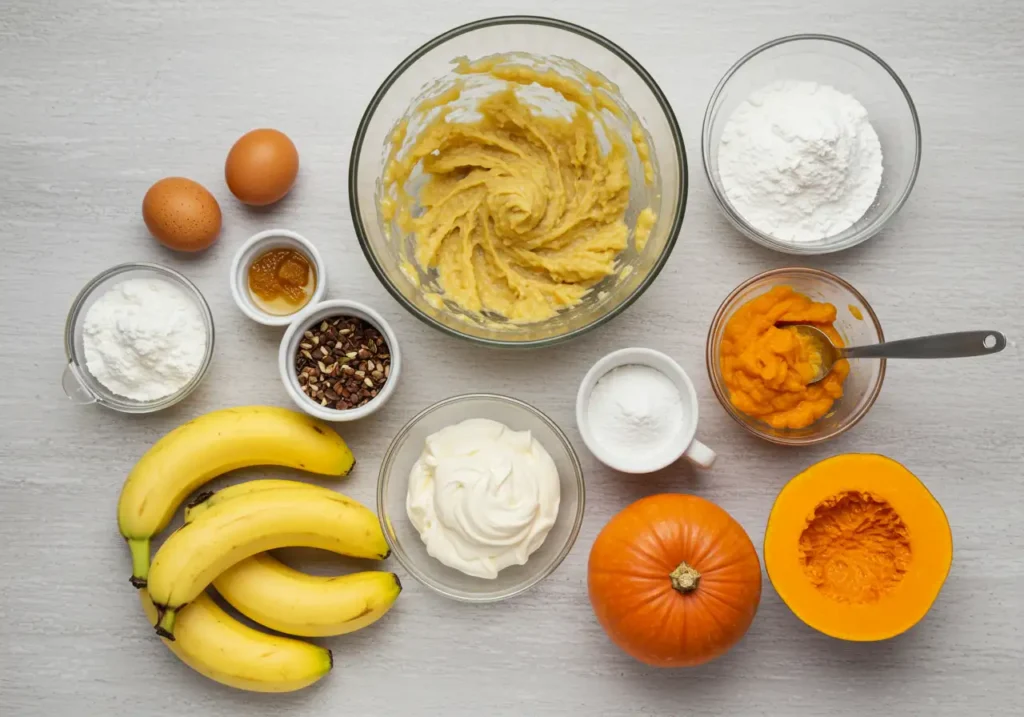
Alright, now that we’ve covered the backstory, let’s focus on what really matters: the ingredients. For starters, you’ll want ripe bananas—they’re sweeter and easier to mash. If your bananas aren’t quite ready yet, don’t worry; pop them in the oven at 300°F for about 15 minutes to speed things along. As for the pumpkin, fresh purée is ideal if you’ve got the time, but canned works just fine too. Just make sure it’s plain pumpkin purée, not pumpkin pie filling, which already contains added sugar and spices.
Other Essential Ingredients for Flavor and Texture
Besides those star players, you’ll need a few trusty sidekicks to bring out the best in your pumpkin banana loaf. Flour provides structure, while sugar adds sweetness without overpowering the natural flavors. Eggs act as binders, keeping everything together, and oil keeps the loaf moist. Oh, and don’t forget the spices! Cinnamon, nutmeg, and cloves give the loaf its signature warmth, making it irresistible.
Here’s a pro tip: if you’re feeling adventurous, toss in some chocolate chips or chopped nuts for extra texture. Trust me, even though the basic recipe is amazing, these little extras can take your pumpkin banana loaf to the next level. Stay tuned for Part 4, where we’ll walk through the step-by-step process of bringing all these ingredients together!
Step-by-Step Guide to Making Pumpkin Banana Loaf
Preparing Your Ingredients
Alright, bakers, let’s get down to business! The first step in making your pumpkin banana loaf is gathering and prepping all the ingredients. You’ll want to measure everything carefully before you start mixing—this will save you time and headaches later. For instance, mash those bananas until they’re smooth and creamy, and if you’re using fresh pumpkin, roast or steam it until soft before blending it into a purée. Oh, and don’t forget to preheat your oven to 350°F (or 180°C). It’s one of those little details that can make a big difference!
Mixing the Wet and Dry Ingredients
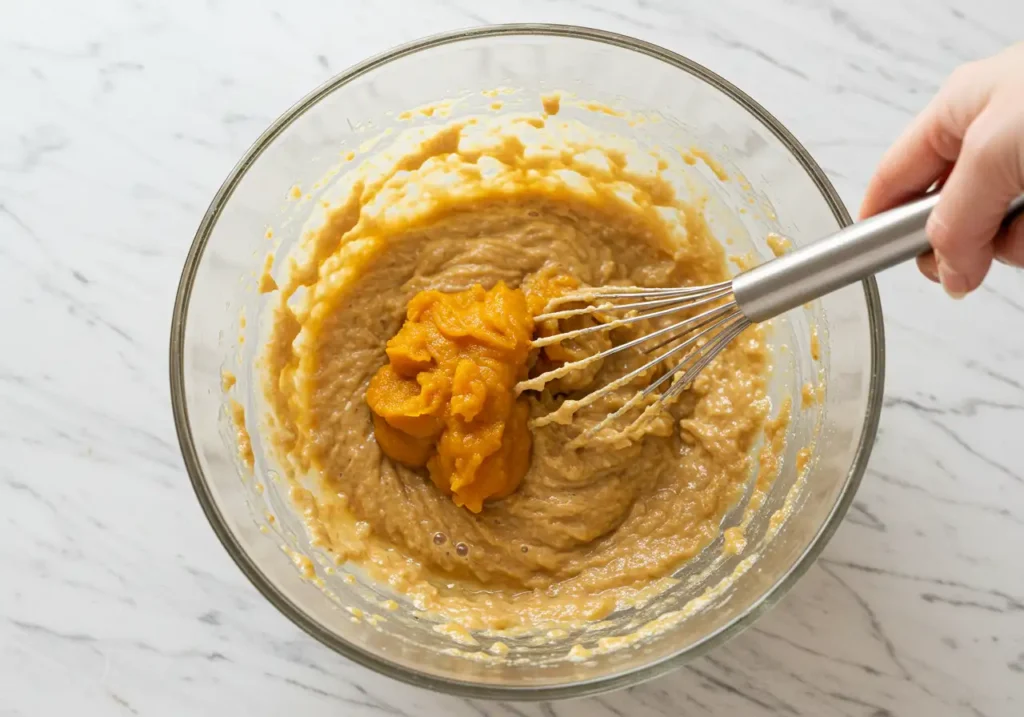
Now comes the fun part: combining everything. Start by whisking together the wet ingredients—your mashed bananas, pumpkin purée, eggs, oil, and vanilla extract—in a large bowl. Once they’re well blended, set them aside for a moment. In another bowl, mix the dry ingredients—flour, baking soda, salt, and spices like cinnamon and nutmeg. Slowly pour the dry mixture into the wet ingredients, stirring gently until just combined. Be careful not to overmix; otherwise, your pumpkin banana loaf might turn out dense instead of fluffy.
Baking Tips for Flawless Results
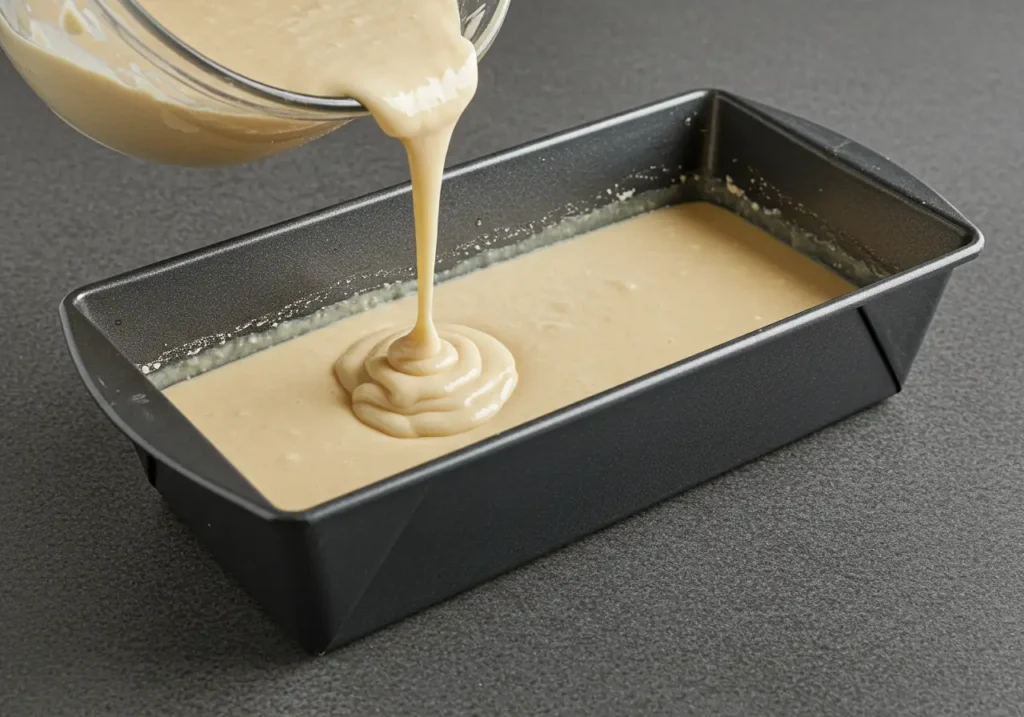
Once your batter is ready, pour it into a greased loaf pan. Tap the pan lightly on the counter to release any air bubbles—this helps ensure an even bake. Pop it in the oven and let it work its magic for about 50–60 minutes. To check if it’s done, insert a toothpick into the center of the loaf. If it comes out clean, you’re golden! If not, give it a few more minutes. And remember, patience is key here. Let the loaf cool completely before slicing into it—you’ll thank me later.
For more delicious recipes, check out our recipe article on Classic Banana Bread or Spiced Pumpkin Muffins!
Variations and Add-Ins for Your Pumpkin Banana Loaf
Popular Additions to Enhance Flavor
One of the coolest things about the pumpkin banana loaf is how customizable it is. Feeling adventurous? Try adding chocolate chips for a sweet kick or chopped walnuts for some crunch. Dried cranberries or raisins are also fantastic options if you want a fruity twist. Want to keep it healthier? Swap white sugar for honey or maple syrup, and throw in some flaxseeds or chia seeds for added nutrition.
Gluten-Free and Vegan Options
What if you or someone in your family has dietary restrictions? No worries! There are plenty of ways to adapt this recipe. For a gluten-free version, substitute all-purpose flour with almond flour or a certified gluten-free blend. As for vegan options, replace eggs with flax eggs (1 tablespoon of ground flaxseed mixed with 3 tablespoons of water per egg) and use plant-based milk or oil instead of butter. Honestly, these swaps won’t affect the taste much—they’ll just make your pumpkin banana loaf accessible to everyone at the table.
Let’s face it, baking should be fun, not stressful. So experiment with different combinations and see what works best for you. Whether you stick to the classic recipe or go wild with add-ins, your pumpkin banana loaf is sure to impress. Stick around for Part 6, where we’ll cover storing and serving tips to keep your loaf tasting fresh as ever!
Storing and Serving Your Pumpkin Banana Loaf
How to Store Pumpkin Banana Loaf Properly
Now that your pumpkin banana loaf is baked to perfection, it’s important to store it correctly so it stays fresh for as long as possible. If you’re planning to enjoy it within a few days, wrap the loaf tightly in plastic wrap or place it in an airtight container. Keep it at room temperature for up to three days—any longer than that, and it might start losing its moisture.
But what if you want to save some for later? No problem! You can freeze slices of your pumpkin banana loaf for up to three months. Simply wrap each slice individually in plastic wrap, then place them in a freezer-safe bag. When you’re ready to eat, let the slice thaw at room temperature or warm it slightly in the microwave for a soft, gooey treat.
Creative Ways to Serve This Delicious Treat
Serving ideas are where things get really fun. Sure, you can slice your pumpkin banana loaf and serve it plain—but why stop there? Top it with a dollop of whipped cream or a scoop of vanilla ice cream for a decadent dessert. Or, if you’re feeling fancy, drizzle some caramel sauce over the top for extra sweetness. For breakfast, pair it with a cup of coffee or tea—it’s like having a little piece of fall on a plate!
If you’re looking for something lighter, try cutting the loaf into smaller portions and serving them as snack-sized bites. They’re perfect for sharing with friends or packing in lunchboxes. And hey, don’t forget about brunch! Slice the loaf thickly and serve it alongside scrambled eggs or avocado toast for a balanced meal.
For more creative serving ideas, check out our article on Fall-Themed Desserts!
FAQs About Pumpkin Banana Loaf
- Can I substitute pumpkin purée with another ingredient?
Absolutely! While pumpkin purée adds a unique flavor and moisture, you could experiment with other pureed fruits like applesauce or sweet potato. Just keep in mind that the taste will change slightly. - How many bananas do I need for the recipe?
Typically, three large ripe bananas work perfectly for most recipes. However, if your bananas are smaller, you may need four to achieve the right consistency. - Is this recipe suitable for beginners?
Yes, absolutely! The pumpkin banana loaf is straightforward and forgiving, making it a great project for new bakers. Plus, mistakes often lead to tasty surprises! - What can I add to make it healthier?
Swap refined sugar with honey or maple syrup, use whole wheat flour instead of all-purpose flour, and toss in some nuts or seeds for added fiber and nutrients. - Can I double the recipe for larger batches?
Sure thing! Just be mindful of baking times—if using multiple pans, rotate them halfway through cooking to ensure even baking.
That wraps up our guide to the pumpkin banana loaf. Happy baking!
Final Thoughts and Encouragement
Why You Should Try This Recipe Today
Let’s wrap things up with a little pep talk. Baking a pumpkin banana loaf isn’t just about creating something delicious—it’s also about enjoying the process. From mixing ingredients to pulling that golden-brown loaf out of the oven, every step is a chance to slow down and savor the moment. Plus, there’s nothing quite like sharing your creation with loved ones. Whether it’s family, friends, or coworkers, they’ll appreciate the effort—and the taste, of course!
Don’t worry if your first attempt isn’t perfect. Baking is all about trial and error, and each time you make this pumpkin banana loaf, you’ll learn something new. So grab those overripe bananas, dig out some pumpkin purée, and get started. Trust me, once you take that first bite, you’ll know it was worth it.
For even more baking ideas, check out our article on Easy Fall Desserts. Happy baking, and enjoy the season!
Print
Pumpkin Banana Loaf: A Sweet and Spiced Delight
- Total Time: 1 hour 5 minutes
- Yield: 1 loaf (about 10 slices) 1x
- Diet: Vegetarian
Description
Why choose between banana bread and pumpkin loaf when you can have both? This moist, spiced, and perfectly sweet Pumpkin Banana Loaf brings together the best of both worlds. It’s a one-bowl wonder, naturally sweetened, and perfect with your morning coffee or tea!
Ingredients
Wet Ingredients:
- 2 ripe bananas, mashed
- ¾ cup pumpkin purée (not pumpkin pie filling)
- ½ cup brown sugar (or coconut sugar)
- ¼ cup maple syrup or honey
- ⅓ cup melted butter (or coconut oil)
- 2 eggs
- 1 tsp vanilla extract
Dry Ingredients:
- 1 ¾ cups all-purpose flour (or whole wheat flour)
- 1 tsp baking soda
- ½ tsp baking powder
- 1 ½ tsp pumpkin spice (or a mix of cinnamon, nutmeg, and cloves)
- ¼ tsp salt
Optional Mix-ins:
- ½ cup chopped walnuts or pecans
- ½ cup chocolate chips
Instructions
1. Prep & Preheat
- Preheat oven to 350°F (175°C).
- Grease and line a 9×5-inch loaf pan with parchment paper.
2. Mix the Batter
- In a large bowl, whisk together mashed bananas, pumpkin purée, sugar, maple syrup, melted butter, eggs, and vanilla extract.
- Sprinkle in the flour, baking soda, baking powder, pumpkin spice, and salt. Stir until just combined—don’t overmix!
- Fold in nuts or chocolate chips, if using.
3. Bake Until Golden
- Pour the batter into the prepared loaf pan.
- Bake for 50-60 minutes, or until a toothpick inserted in the center comes out clean.
4. Cool & Enjoy!
- Let the loaf cool in the pan for 10 minutes, then transfer to a wire rack to cool completely.
- Slice and serve with butter, cream cheese, or a drizzle of honey!
Notes
✔ For extra moisture, add 2 tbsp Greek yogurt or sour cream to the batter.
✔ No eggs? Use 2 flax eggs (2 tbsp flaxseed meal + 5 tbsp water).
✔ Make muffins! Pour the batter into muffin tins and bake for 18-22 minutes.
- Prep Time: 10 minutes
- Cook Time: 55 minutes
- Category: Breakfast, Dessert
- Method: Baking
- Cuisine: American
Nutrition
- Serving Size: 1 slice
- Calories: 220
- Sugar: 12g
- Sodium: 170mg
- Fat: 9g
- Saturated Fat: 4g
- Unsaturated Fat: 5g
- Trans Fat: 0g
- Carbohydrates: 32g
- Fiber: 2g
- Protein: 4g
- Cholesterol: 40mg