Let’s face it—there’s something magical about marble cake. You know, that classic dessert with its swirls of chocolate and vanilla? It’s one of those treats that never gets old. Whether you’re baking for a birthday party, holiday gathering, or just because you feel like indulging, marble cake is always a hit! In this article, we’ll dive into everything you need to know about making the perfect marble cake—from picking out ingredients to avoiding common mistakes. Along the way, I’ll share some tips, tricks, and even a few fun variations so your marble cake can stand out. So grab your apron (and maybe a cup of coffee), and let’s get started!
Introduction to Marble Cake
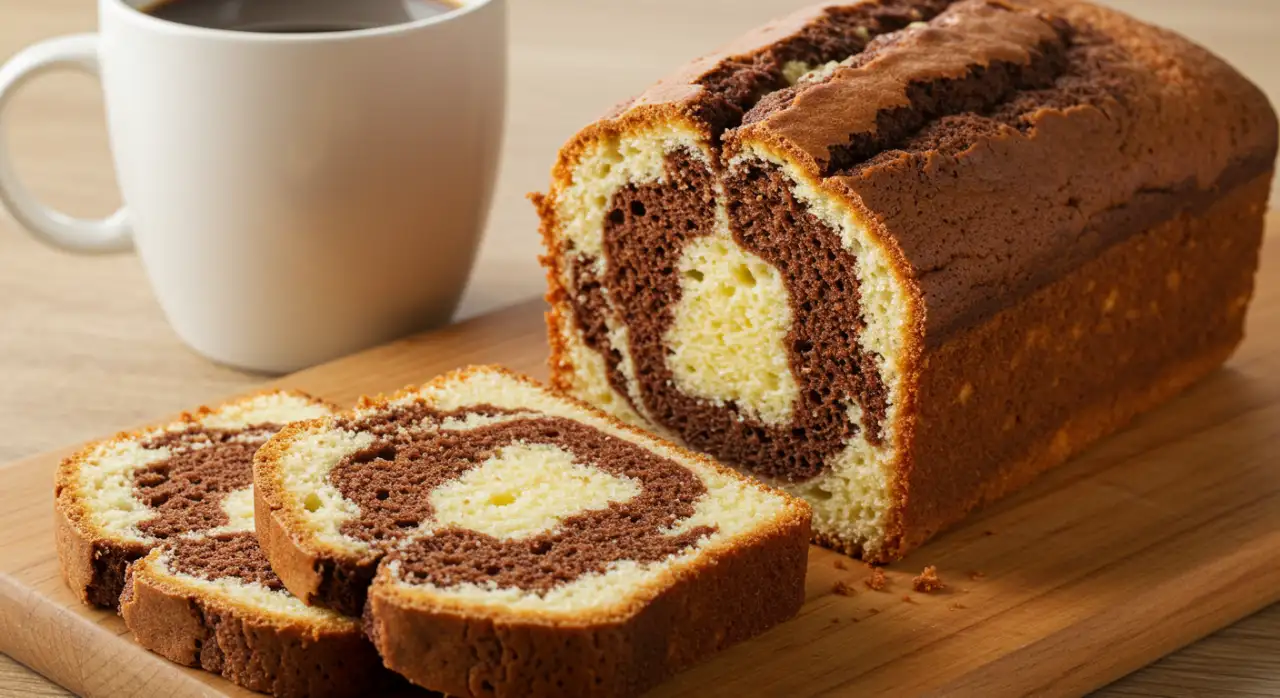
What is Marble Cake?
Marble cake is more than just a dessert—it’s an experience! This timeless treat combines two beloved flavors: rich chocolate and creamy vanilla. The magic happens when these two batters are swirled together in a delicate dance, creating a marbled effect that looks almost too good to eat. But trust me, you’ll want to dig in! Historically, marble cake has been around since the 19th century, originating from Europe before making its way across the pond to America. Back then, folks didn’t have fancy mixers or ovens, but they still managed to create something truly special. And honestly, isn’t it amazing how such a simple idea became a baking staple?
If there’s one thing people love about marble cake, it’s its versatility. It works for any occasion, whether it’s dressed up with frosting for a formal event or enjoyed plain as a cozy snack at home.
Why Marble Cake is a Crowd Favorite
There’s no denying that marble cake has staying power. Its appeal lies in its balance—rich yet not overwhelming, sweet without being cloying. Plus, who doesn’t love the visual wow factor of those signature swirls? Let’s be real, though; sometimes life gets busy, and we don’t have time to fuss over complicated recipes. That’s where marble cake shines—it’s relatively easy to make while still feeling fancy. With a little practice, anyone can master the art of swirling batter and end up with a showstopper dessert. Keep reading because next, we’ll talk about what goes into making the best marble cake ever!
Ingredients for the Perfect Marble Cake
Essential Ingredients for Making Marble Cake
Alright, let’s talk about what you’ll need to whip up a fantastic marble cake. First off, the basics: flour, sugar, eggs, butter, and vanilla extract. These ingredients form the foundation of your vanilla batter. For that rich chocolate layer, you’ll want cocoa powder or melted chocolate—your choice! Don’t forget baking powder and salt to give your cake structure and flavor. Oh, and milk or cream helps keep everything moist and smooth.
Now, here’s the thing: quality matters. If you can splurge on good-quality butter or chocolate, do it! Trust me, your taste buds will thank you later. But hey, if budget’s tight, don’t stress. Just make sure all your ingredients are fresh, okay? Also, room-temperature items work best when mixing batters because they blend easier. Pro tip: take your eggs and butter out of the fridge an hour before starting.
Substitutions for Common Ingredients
What if you’ve got dietary restrictions or just ran out of something? No worries! There are plenty of ways to tweak your marble cake recipe. Need a gluten-free option? Swap regular flour for almond flour or a certified gluten-free blend. Want to go vegan? Use plant-based milk instead of dairy and flax eggs in place of real ones. Can’t have refined sugar? Try honey, maple syrup, or coconut sugar.
The beauty of marble cake is its flexibility. As long as you maintain the right ratios, substitutions won’t ruin the final product. Just remember, certain changes might affect texture slightly, so adjust expectations accordingly. And speaking of adjustments, next up, we’ll walk through how to actually bake this beauty step by step!
Step-by-Step Guide to Baking Marble Cake
1. Prep & Preheat
Preheat oven to 350°F (175°C).
Grease and flour a 9×5-inch loaf pan (or a bundt pan for extra flair).
2. Mix Dry Ingredients
In a bowl, whisk together flour, baking powder, and salt. Set aside.
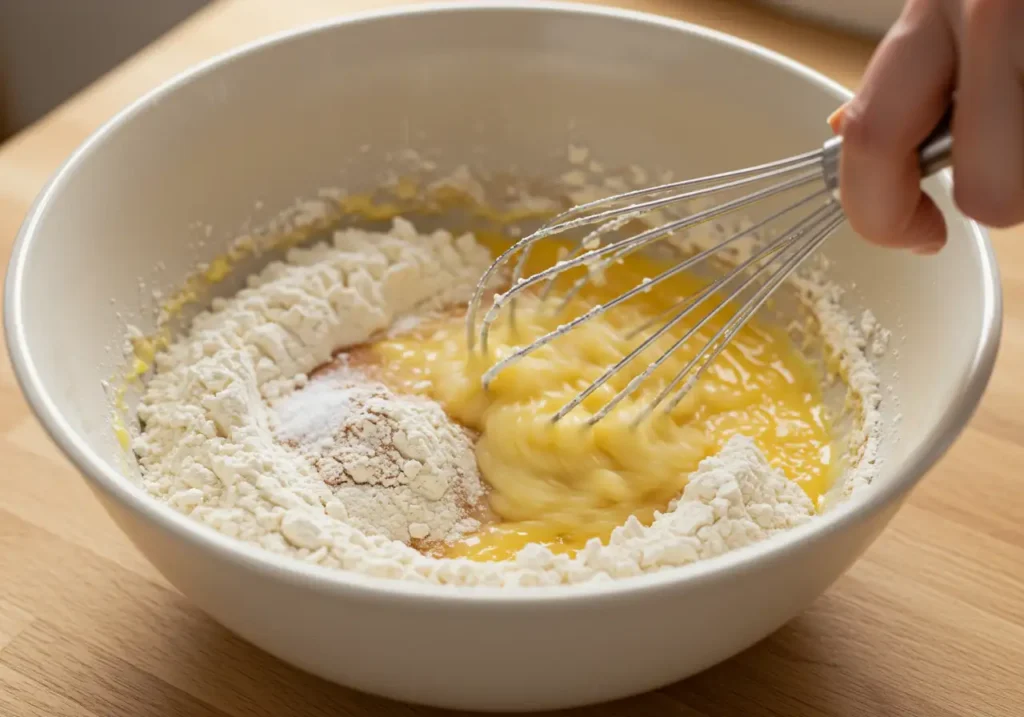
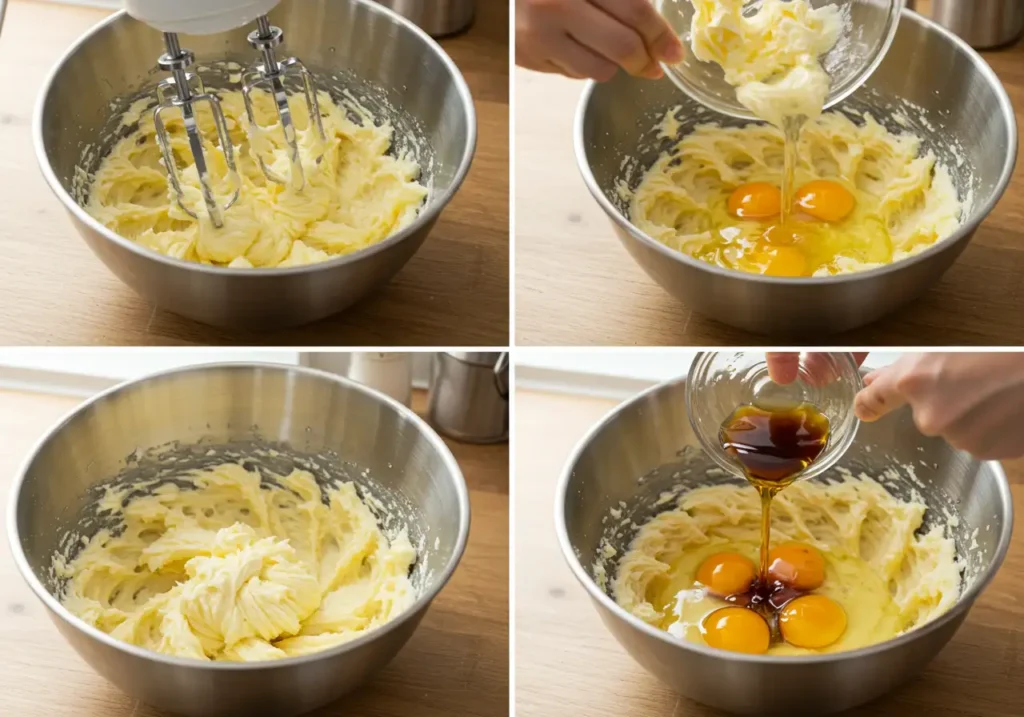
3. Cream Butter & Sugar
In another large bowl, beat butter and sugar until light and fluffy.
Add eggs, one at a time, beating well after each.
Stir in vanilla extract.
4. Combine Batter
Gradually add the dry ingredients, alternating with milk, mixing until just combined.
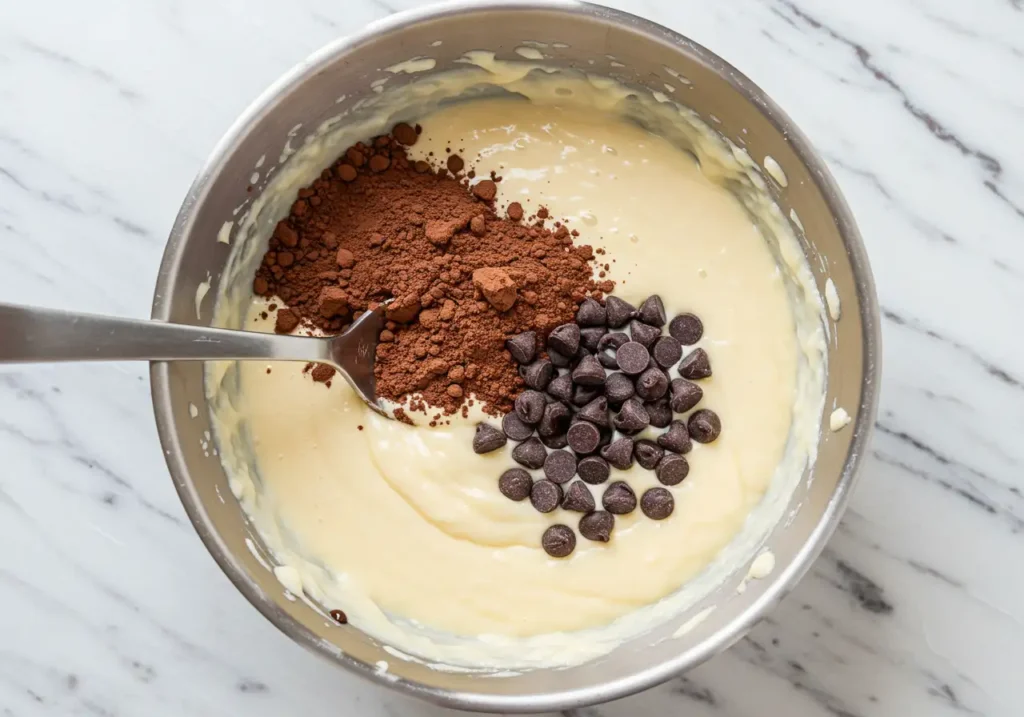
5. Make the Chocolate Batter
In a small bowl, mix cocoa powder with hot water until smooth.
Take ⅓ of the vanilla batter and mix it with the cocoa mixture. Add melted chocolate chips for extra richness.
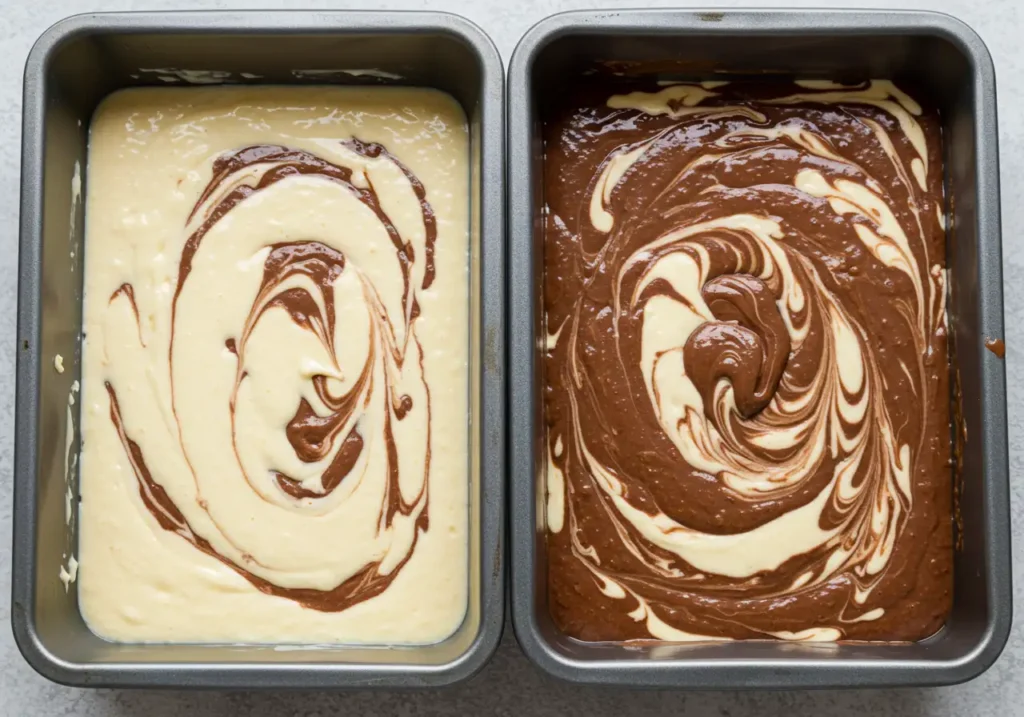
6. Swirl the Cake
Pour half of the vanilla batter into the prepared pan.
Add spoonfuls of chocolate batter on top.
Swirl gently with a knife to create a marbled effect.
Repeat with remaining vanilla and chocolate batter.
7. Bake & Cool
Bake for 50–60 minutes (or until a toothpick comes out clean).
Let cool for 10 minutes in the pan, then transfer to a wire rack.
Pro Tips
✔ For an ultra-moist cake, replace ¼ cup of butter with ¼ cup of sour cream or yogurt.
✔ Want a deeper chocolate flavor? Add a teaspoon of instant coffee to the cocoa mixture.
✔ Make it extra fancy by drizzling with chocolate ganache or dusting with powdered sugar.
Variations of Marble Cake
Flavor Enhancements for Your Marble Cake
Let’s spice things up a bit! While the classic marble cake is undeniably delicious, there’s nothing wrong with adding a little extra flair. Consider incorporating spices like cinnamon or nutmeg into your vanilla batter for a warm, comforting twist. Or, if you’re feeling adventurous, try zesting some lemon or orange peel into the mix. These subtle additions can really elevate—uh, I mean, enhance the overall taste experience.
If you’re looking to add texture, fold in chopped nuts like walnuts or pecans. Not only do they provide crunch, but they also pair beautifully with chocolate. For a tropical twist, pineapple chunks or shredded coconut could be just what your marble cake needs. Just remember, less is often more when experimenting with new flavors. Start small and adjust based on preference.
For more delicious recipes, check out our article on how to bake perfect cupcakes. You might discover ideas that work well with marble cake too!
Different Styles of Marble Cake
Who says marble cake has to stick to one shape? Get creative with presentation! A bundt pan creates stunning swirls along the sides, making it ideal for centerpieces. Cupcake versions are perfect for parties—they’re bite-sized and fun to decorate individually. Loaf pans offer a rustic charm, great for casual brunches or afternoon snacks. Mini marble cakes are another option worth exploring; they’re adorable and easy to share.
No matter which style you choose, the key is consistency. Make sure your batter proportions remain balanced so every piece delivers that signature chocolate-vanilla harmony. And hey, don’t forget about decorating options! Frosting, sprinkles, or even fresh fruit slices can turn a simple slice into something extraordinary.
Common Mistakes When Making Marble Cake
Overmixing the Batter
One of the biggest pitfalls people encounter when baking marble cake is overmixing the batter. It’s tempting to keep swirling once you pour the chocolate and vanilla together, but too much agitation can lead to a dense, unappealing result. Instead, aim for gentle folds or light zigzag motions with a knife. Remember, those beautiful marbled patterns come from restraint, not brute force.
If you notice your batter starting to look uniform, stop immediately. Trust me, uneven swirls are way better than losing the distinction altogether. Plus, slightly imperfect designs add character to your finished product.
Improper Swirling Technique
Another common issue is improper swirling. If you go overboard, the layers blend completely, resulting in a lackluster appearance. On the flip side, barely touching the surface won’t create enough contrast either. Aim for balance—a few deliberate strokes should suffice.
To avoid these mistakes, practice makes perfect. Don’t hesitate to experiment with different tools or techniques until you find what works best for you. And remember, baking is supposed to be fun! So relax, enjoy the process, and embrace imperfections. After all, they’re part of what makes homemade treats so special.
Serving Suggestions for Marble Cake
Pairings That Complement Marble Cake
Now that you’ve baked your marble cake, it’s time to think about how to serve it. Coffee or tea pairs beautifully with the rich flavors of chocolate and vanilla, making it a go-to choice for morning or afternoon indulgence. A glass of cold milk is another classic option, especially if you’re serving kids—or just feeling young at heart! If you’re looking for something fancier, try pairing your marble cake with dessert wines like port or sherry. These drinks bring out the depth in both the chocolate and vanilla layers.
For an extra treat, consider drizzling warm caramel sauce or melted chocolate over each slice. Fresh berries, whipped cream, or a dusting of powdered sugar can also elevate the presentation without overpowering the flavor.
If you’re hosting a party, why not set up a toppings bar? Let guests customize their slices with sprinkles, nuts, or even ice cream scoops. It’s interactive, fun, and sure to please everyone!
Decorating Ideas for Marble Cake
When it comes to decorating, simplicity often wins. Dusting powdered sugar lightly over the top gives a clean, elegant look. For themed events, try piping frosting designs using contrasting colors—like white and dark chocolate—to highlight the marbling effect. You could also use fresh fruits like strawberries or raspberries for a pop of color.
For more inspiration on decorating cakes, check out our article on creative cake decorating ideas. Who knows? You might find some tricks to apply to your next marble cake creation!
Healthier Versions of Marble Cake
Nutritious Alternatives in Marble Cake Recipes
Who says marble cake has to be off-limits for health-conscious bakers? There are plenty of ways to make this dessert lighter while keeping its charm intact. Start by swapping all-purpose flour with whole wheat or almond flour. These alternatives provide fiber and nutrients without sacrificing texture. Similarly, replace refined sugar with natural sweeteners like honey, maple syrup, or coconut sugar. They add sweetness while offering additional health benefits.
Another great tweak is reducing butter content by incorporating applesauce or mashed bananas. These substitutes help retain moisture while cutting down on fat. Plus, they give your marble cake a subtle fruity undertone that complements the chocolate-vanilla combo perfectly.
Reducing Sugar Without Losing Flavor
Cutting back on sugar doesn’t mean compromising taste. Begin by reducing the amount called for in your recipe gradually until you find the right balance. Adding spices like cinnamon or nutmeg enhances perception of sweetness naturally. Vanilla extract works wonders too—it intensifies flavor without adding calories.
Remember, healthier doesn’t have to mean boring. With a few smart swaps, your marble cake can still feel indulgent while being kinder to your body. And hey, isn’t that what baking is all about—finding joy in every bite?
FAQs About Marble Cake
What does marble cake taste like?
Marble cake combines the rich, indulgent flavor of chocolate with the smooth, comforting taste of vanilla. The two flavors swirl together in each bite, creating a harmonious balance that’s neither too sweet nor overly rich. It’s light, moist, and perfectly satisfying for any occasion. If you enjoy desserts that blend simplicity with elegance, marble cake is sure to be a hit!
How do you marbleize a cake?
To marbleize a cake, start by dividing your batter into two portions—one plain vanilla and one chocolate-flavored. Pour alternating spoonfuls of each batter into the prepared pan, then gently swirl them together using a knife or toothpick. Be careful not to overmix; just a few zigzag motions should create beautiful, distinct swirls. This technique ensures your marble cake has that iconic marbled effect.
Why are they called marble cake?
Marble cakes get their name from their striking resemblance to real marble stone. When chocolate and vanilla batters are swirled together, they form intricate patterns that mimic the veining found in marble. This visual appeal makes marble cake both delicious and visually stunning—a true showstopper on any dessert table.
What is the hardest cake in the world?
While opinions vary, many bakers consider the soufflé cake or certain types of sponge cakes (like genoise) among the hardest to perfect. These cakes require precise techniques, delicate handling, and careful attention to detail during baking. Even small mistakes can lead to collapse or uneven texture. However, practice and patience make all the difference—so don’t let the challenge deter you from trying!
How do you prevent the marble cake from being too dense?
A common concern when baking marble cake is ending up with a dense, heavy texture. To avoid this, start by ensuring your ingredients are at room temperature before mixing. Cold butter or eggs can lead to clumps and uneven batter. Additionally, don’t overmix your batter—this incorporates too much air, which can cause the cake to collapse during baking. Use a light hand when folding in the chocolate and vanilla portions, and only swirl them together enough to create distinct marbling.
Another tip? Make sure your leavening agents, like baking powder, are fresh. Expired ones won’t provide the lift your cake needs. Lastly, follow your recipe’s baking time closely. Overbaking can dry out the cake, making it feel denser than intended.
Conclusion
There you have it—a complete guide to mastering the art of marble cake. From understanding its origins and essential ingredients to troubleshooting common mistakes, we’ve covered everything you need to bake like a pro. Whether you stick to the classic recipe or experiment with creative variations, remember that practice makes perfect. Don’t be afraid to make adjustments based on personal taste and dietary preferences. After all, baking is all about having fun and sharing joy with others.
So go ahead, gather your tools, and get started on your next marble cake adventure. And if you’re looking for more inspiration, check out our article on easy dessert recipes for even more ideas. Happy baking!
Print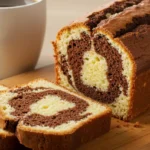
How to Make a Perfect Marble Cake (Step-by-Step Guide)
- Total Time: 1 hour 5 minutes
- Yield: 10 slices 1x
- Diet: Vegetarian
Description
This Marble Cake is a simple yet stunning treat that combines the best of both worlds: rich chocolate and light vanilla swirls! It’s super soft, perfectly moist, and guaranteed to satisfy your sweet tooth. Let’s get baking!
Ingredients
For the Cake:
- 2 ½ cups all-purpose flour
- 2 ½ tsp baking powder
- ½ tsp salt
- 1 cup unsalted butter, softened
- 1 ¾ cups granulated sugar
- 4 eggs
- 1 tbsp vanilla extract
- 1 cup milk (or buttermilk for a fluffier texture)
- ¼ cup unsweetened cocoa powder
- 2 tbsp hot water
For the Chocolate Swirl:
- ¼ cup semi-sweet chocolate chips, melted (optional for extra chocolate richness)
Instructions
1. Preheat & Prepare Pan
- Preheat your oven to 350°F (175°C).
- Grease and flour a 9×5-inch loaf pan (or use a Bundt pan for an elegant shape).
2. Mix Dry Ingredients
- In a medium bowl, whisk together flour, baking powder, and salt. Set aside.
3. Cream Butter and Sugar
- In a large bowl, beat butter and sugar together until light and fluffy, about 3–4 minutes.
- Add eggs, one at a time, beating well after each. Stir in vanilla extract.
4. Combine Wet and Dry Ingredients
- Gradually add the dry ingredients to the butter mixture, alternating with milk, until just combined.
5. Make the Chocolate Batter
- In a small bowl, mix cocoa powder with hot water to make a smooth paste.
- Take ⅓ of the vanilla batter and mix it with the cocoa paste to form the chocolate batter. You can also add the melted chocolate chips to this mixture for an even richer flavor.
6. Assemble the Cake
- Pour half of the vanilla batter into the prepared pan.
- Add spoonfuls of the chocolate batter on top.
- Repeat with the remaining vanilla and chocolate batters.
- Use a knife or skewer to gently swirl the batters together, creating a marbled effect.
7. Bake & Cool
- Bake for 50–60 minutes or until a toothpick inserted comes out clean.
- Let the cake cool in the pan for 10 minutes before transferring to a wire rack to cool completely.
Notes
✔ For a richer cake, add a tablespoon of sour cream to the batter.
✔ Add nuts like walnuts or pecans into the batter for a delightful crunch.
✔ For a festive touch, drizzle melted chocolate ganache over the cooled cake.
- Prep Time: 15 minutes
- Cook Time: 50 minutes
- Category: Dessert
- Method: Baking
- Cuisine: American
Nutrition
- Serving Size: 1 slice
- Calories: 320
- Sugar: 24g
- Sodium: 180mg
- Fat: 15g
- Saturated Fat: 9g
- Unsaturated Fat: 6g
- Trans Fat: 0g
- Carbohydrates: 42g
- Fiber: 2g
- Protein: 5g
- Cholesterol: 75mg